Easy AI Image Inpainting, Outpainting & Upscaling: 4 PixAI Edit Tools
Master PixAI's easy AI image inpainting, outpainting, and upscaling tools to fix flaws, remove objects, expand canvas, and refine AI artwork.
Edit your AI art with natural language. Try it in PixAI.
Try PixAI FreeAI image inpainting is one of the most powerful ways to fix flaws in AI-generated artwork — from removing extra fingers to swapping eye colors, all without regenerating the whole image. So you’ve created a cute AI-generated image, but something feels off — maybe the colors aren’t quite right, or there’s an extra finger where there shouldn’t be. Don’t worry! In this complete guide to PixAI’s AI image editing tools, we’ll walk you through everything you need: AI inpainting, AI outpainting, AI image upscaling, and image variations.
- Generation Panel – For quick AI-powered upgrades (Variations, Enhance, HiRes)
- Edit Panel – For precise manual adjustments (AI Inpaint, AI Outpaint)
Here’s a quick overview of the 4 essential AI image editing tools we’ll cover:
| Tool | Function | Best For |
|---|---|---|
| Variations | Generate slightly different versions of your image | Testing new styles |
| Upscale | Improve image quality with AI upscaling | Sharpening blurry images |
| Inpaint | Edit, remove, or add small details via AI inpainting | Fixing hands, changing eyes |
| Outpaint | Expand your image’s canvas with AI outpainting | Revealing more of the scene |
Table of Contents
Generation Panel: AI Image Variations & Upscaling Tools
The Generation Panel houses PixAI’s quick AI-powered fixes — perfect when you need to test variations or boost image quality without manual masking.

AI Image Variations: Generate Different Versions of Your Image

Got an image you love but want to tweak it slightly? Click Variations, and PixAI’s AI will generate three fresh takes on your original — different angles, slightly altered details, or new color tones, all while keeping the core subject intact.
✅ Best for: Testing different styles without starting from scratch.

Upscale — AI Image Upscaling for Sharper Details
Think of this as giving your image a pair of glasses — PixAI’s AI image upscaler makes everything clearer without altering details.


🔹 Key Settings:
- Upscaler — Different AI upscaling models handle sharpening differently.
- Upscale Ratio — Higher ratios improve resolution.
💡 Pro Tip: You can enhance any image—not just AI-generated ones! Got a photo or artwork you want to improve?
Just upload your file via the Image Upscaler feature. It’s that simple to turn your blurry images into crisp, clean masterpieces!


HiRes — High-Resolution AI Image Generation
Want ultra-sharp results from the start? Enable HiRes during generation for high-resolution AI image output baked in from the first pass.

⚠️ Important Notes:
- No batch generation — One masterpiece at a time.

- Re-enable if you change dimensions — Otherwise, it won’t apply.

🎨 Ready to try AI inpainting yourself?
Fix fingers, swap colors, remove objects — all without regenerating. Open PixAI’s Edit Panel and start fixing now.
Try AI Inpainting Free →Edit Panel: AI Image Inpainting & Outpainting for Precise Edits
Where the Generation Panel handles broad strokes, the Edit Panel is where surgical precision lives — powered by AI inpainting and AI outpainting for pixel-perfect control.

AI Inpainting: Fix Errors, Remove Objects & Add Details
🎨 Pro Tip: Precision matters! Take time to mask exactly what you want to change.
For super precise edits, AI inpainting lets you modify specific areas while leaving the rest of the image untouched. Here’s what you can do with PixAI’s AI inpainting tool:
Use Case 1: Change Features with AI Inpainting
Example 1: Adjusting a Character’s Expression
- Use the Inpaint brush to mask the mouth.

- Type “parted lips” in the prompt.

- The AI updates only the selected area.

Example 2: Changing Eye Color
- Use the color picker to sample a reference shade(if you’d like to reference the color!).

- Mask the iris completely (missing spots = inconsistencies).

- Prompt: “yellow eyes” (or your chosen color).

Use Case 2: Remove Unwanted Elements with AI Inpainting

Removing Watermarks
- Mask only the watermark.
- Instead of “remove watermark”, describe what should be there (e.g., “white floor”).
Deleting Extra Limbs or Fingers
- Mask the glitched area.
- Prompt something context-aware (e.g., “teddy bear” might replace a stray hand with a toy).

AI Outpainting: Expand Your Image Canvas Beyond the Frame
Want to reveal more of a character’s outfit or the background scene? AI outpainting intelligently extends your image beyond its original borders, generating seamless new content based on your prompt.
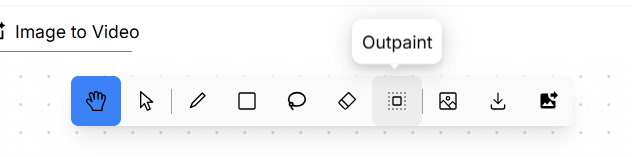
How to Use AI Outpainting on PixAI:
- The AI blends the outpainted content seamlessly with the original image.
- Click Outpaint and drag the edges to expand the canvas.
- Describe what should appear in the new space (e.g., “black dress” for a portrait extension).

🖼 Best Practices for AI Outpainting:
- Extend one edge at a time for better control over the outpainting result.
- Think: “What would logically be here?” to guide your outpainting prompts.
Master PixAI’s AI Image Editing Tools
With these AI image editing tools, you can rescue flawed AI images and refine them into polished artworks. To recap:
- Generation Panel = Quick AI fixes (variations, AI image upscaling, HiRes generation)
- Edit Panel = Surgical adjustments (AI inpainting, AI outpainting)
Whether you need AI inpainting to fix a hand, AI outpainting to expand a canvas, or AI image upscaling to sharpen a blurry image, PixAI’s edit tools have you covered.
Now go forth and perfect your creations! 🚀✨
Edit images like a conversation
Try natural-language editing free on PixAI now
Start Creating Free on PixAINo credit card required · Daily free credits
Related Topics
Looking for natural-language editing instead? Check out our Flow Edit guide. For one-click presets like background removal and face enhance, see our AI Image Enhancer guide.


